前提要点
接上篇我们在 ruoyi-net 模块中编写 WebSocket 代码实现了WebSocket 的消息弹出或系统通知公告弹窗
使用websocket实现最简单的通信
需结合 Spring Cloud 微服务架构特点(注册中心、网关、业务服务)
核心原理
基于 Spring Cloud Alibaba,WebSocket 通信需注意:
1.网关(Gateway)需放行 WebSocket 请求(ws/wss 协议);
2.业务服务(如 system 模块)集成 Spring WebSocket;
3.客户端通过 ws 协议连接业务服务(或通过网关转发)。
##环境准备
确保基础环境正常(Nacos、Sentinel、Gateway 等启动),本次以ruoyi-net服务为例实现 WebSocket。
##服务端实现
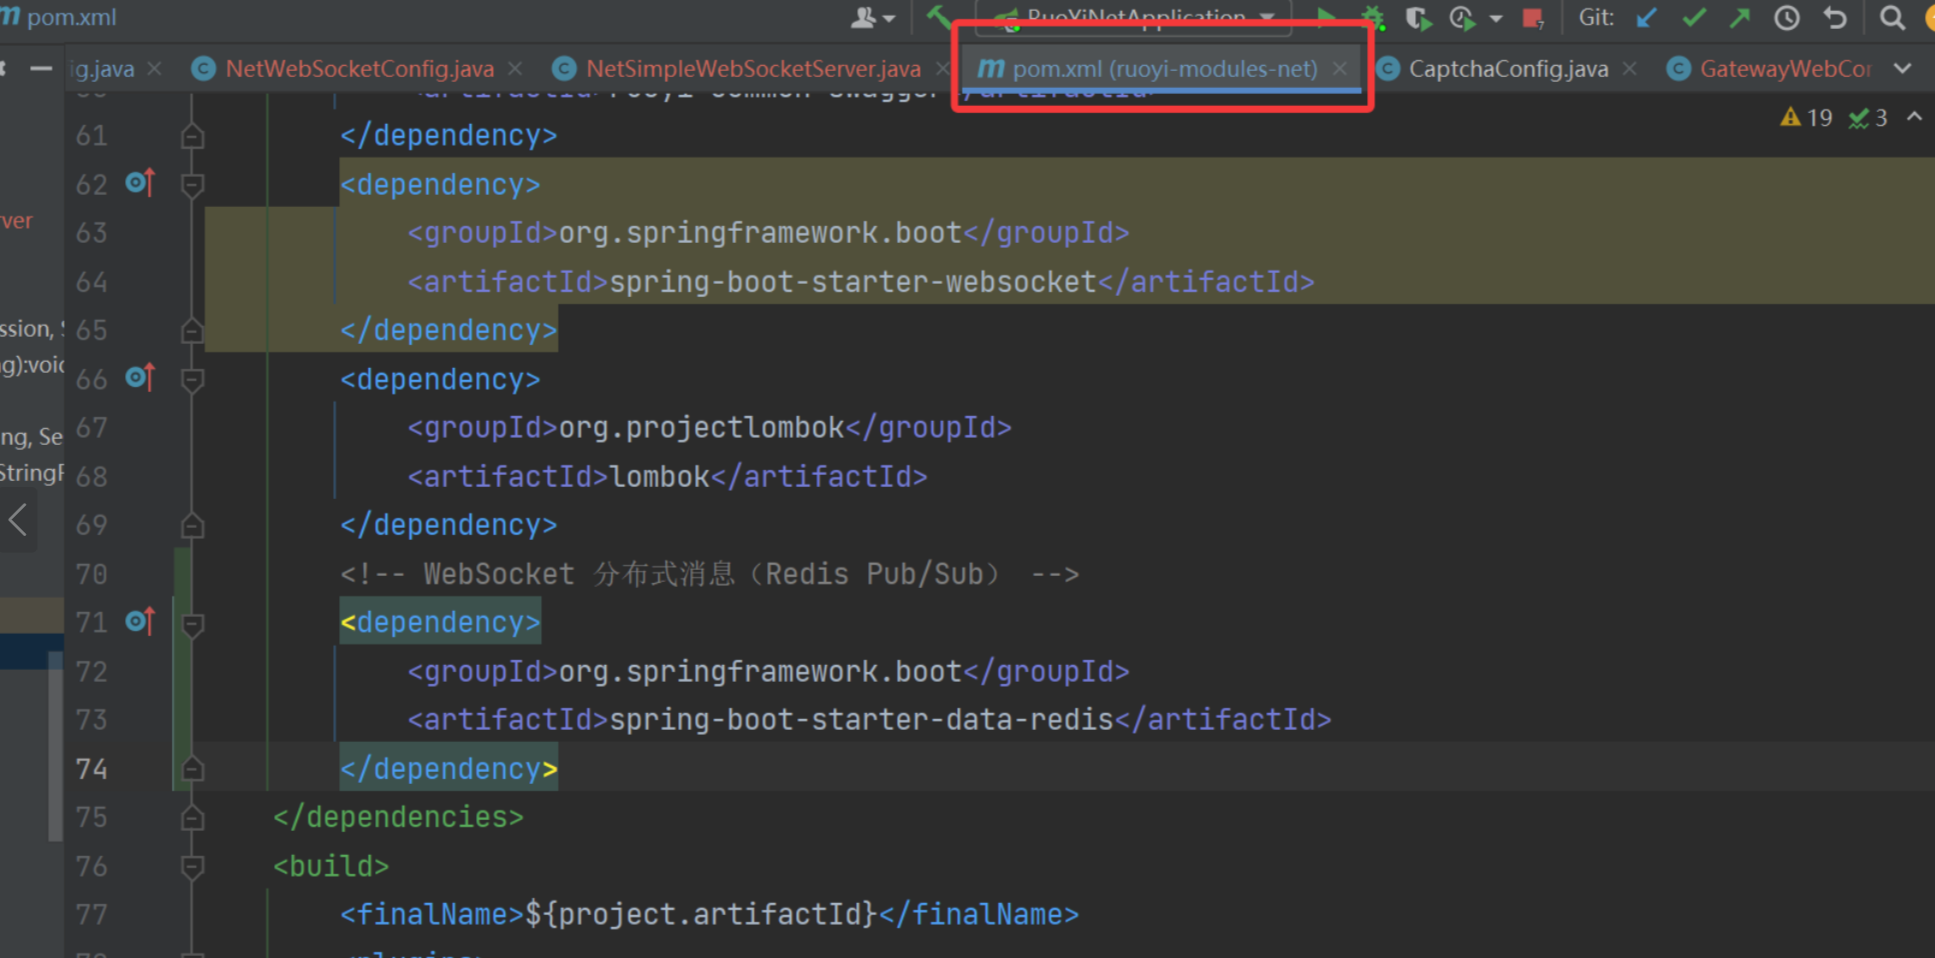
1. 引入依赖(若已存在可忽略)
<!-- WebSocket核心依赖 -->
<dependency>
    <groupId>org.springframework.boot</groupId>
    <artifactId>spring-boot-starter-websocket</artifactId>
</dependency>
<!-- 若依微服务基础依赖(确保已引入) -->
<dependency>
    <groupId>com.ruoyi</groupId>
    <artifactId>ruoyi-common-core</artifactId>
</dependency>
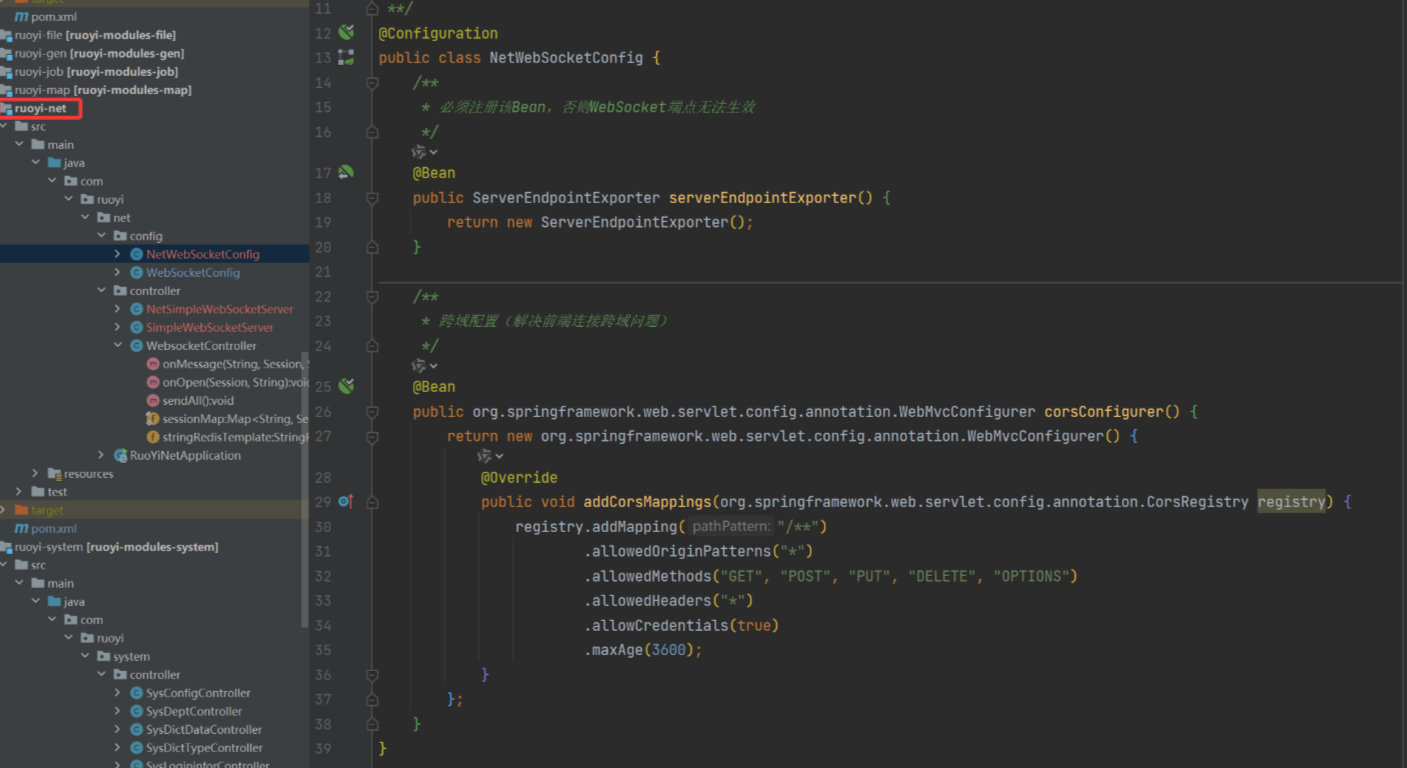
###2. 配置 WebSocket Bean
package com.ruoyi.net.config;

import org.springframework.context.annotation.Bean;
import org.springframework.context.annotation.Configuration;
import org.springframework.web.socket.server.standard.ServerEndpointExporter;

/**
 * ruoyi-net模块的WebSocket配置
 */
@Configuration
public class NetWebSocketConfig {

    /**
     * 必须注册该Bean,否则WebSocket端点无法生效
     */
    @Bean
    public ServerEndpointExporter serverEndpointExporter() {
        return new ServerEndpointExporter();
    }

    /**
     * 跨域配置(解决前端连接跨域问题)
     */
    @Bean
    public org.springframework.web.servlet.config.annotation.WebMvcConfigurer corsConfigurer() {
        return new org.springframework.web.servlet.config.annotation.WebMvcConfigurer() {
            @Override
            public void addCorsMappings(org.springframework.web.servlet.config.annotation.CorsRegistry registry) {
                registry.addMapping("/**")
                        .allowedOriginPatterns("*")
                        .allowedMethods("GET", "POST", "PUT", "DELETE", "OPTIONS")
                        .allowedHeaders("*")
                        .allowCredentials(true)
                        .maxAge(3600);
            }
        };
    }
}
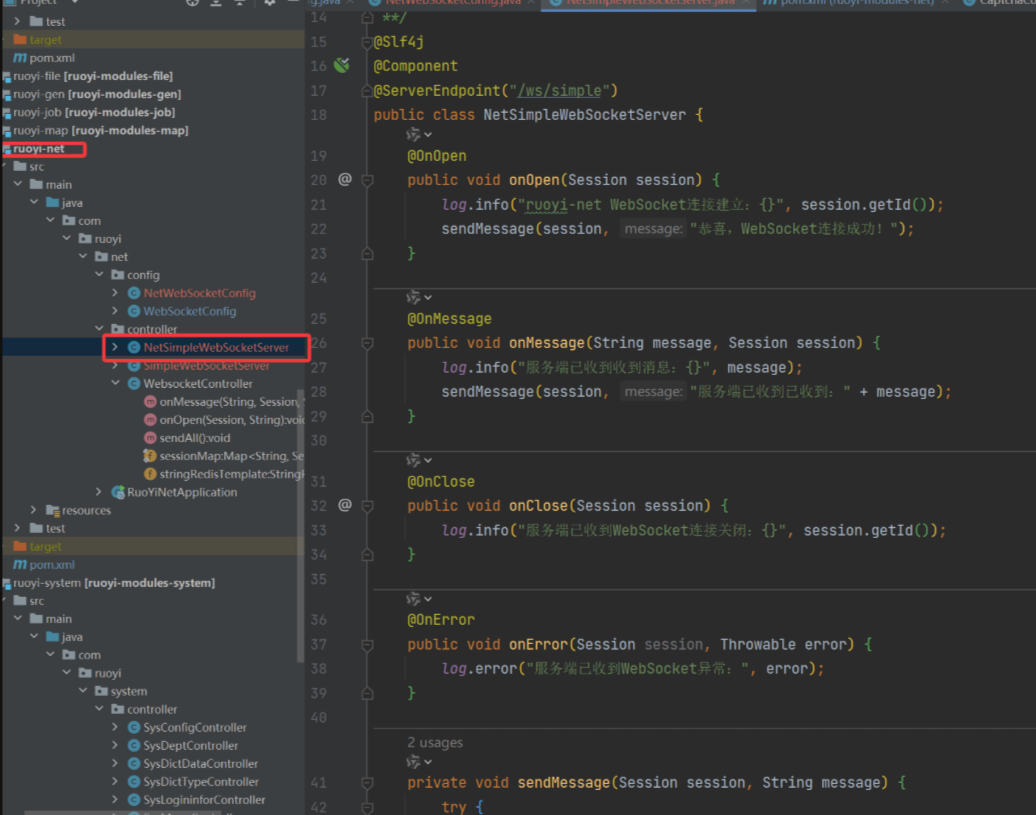
3. 实现最简 WebSocket 服务端点
创建核心通信类,处理连接、消息、关闭、异常:
package com.ruoyi.net.websocket;

import lombok.extern.slf4j.Slf4j;
import org.springframework.stereotype.Component;

import javax.websocket.OnClose;
import javax.websocket.OnMessage;
import javax.websocket.OnOpen;
import javax.websocket.Session;
import javax.websocket.server.ServerEndpoint;
import java.io.IOException;

/**
 * ruoyi-net模块的WebSocket端点
 * 路径:/ws/simple
 */
@Slf4j
@Component
@ServerEndpoint("/ws/simple")
public class NetSimpleWebSocketServer {

    @OnOpen
    public void onOpen(Session session) {
        log.info("ruoyi-net WebSocket连接建立:{}", session.getId());
        sendMessage(session, "ruoyi-net 连接成功!");
    }

    @OnMessage
    public void onMessage(String message, Session session) {
        log.info("ruoyi-net 收到消息:{}", message);
        sendMessage(session, "ruoyi-net 已收到:" + message);
    }

    @OnClose
    public void onClose(Session session) {
        log.info("ruoyi-net WebSocket连接关闭:{}", session.getId());
    }

    @OnError
    public void onError(Session session, Throwable error) {
        log.error("ruoyi-net WebSocket异常:", error);
    }

    private void sendMessage(Session session, String message) {
        try {
            session.getBasicRemote().sendText(message);
        } catch (IOException e) {
            log.error("发送消息失败:", e);
        }
    }
}
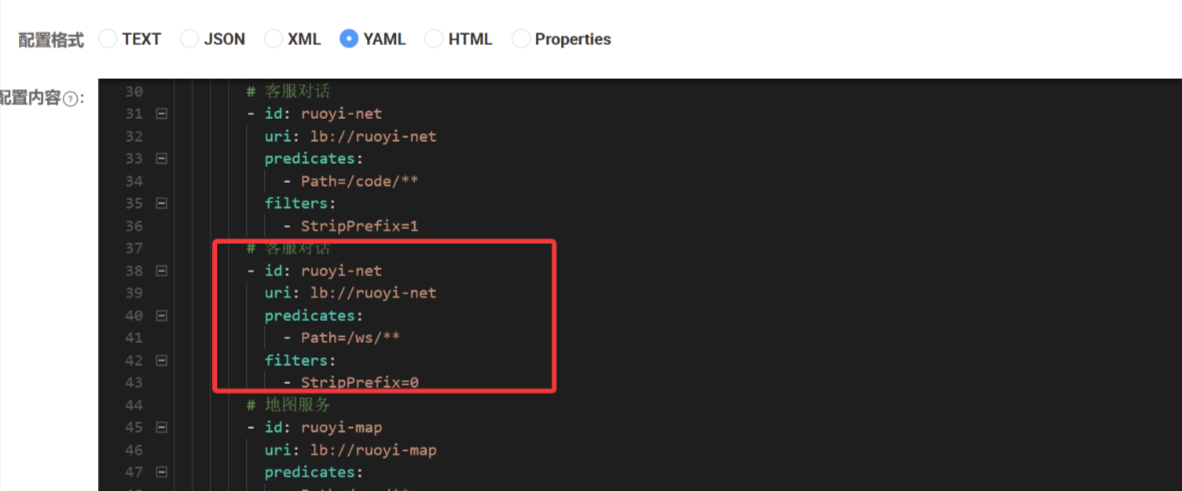
网关配置(ruoyi-gateway 模块
打开ruoyi-gateway/src/main/resources/application.yml,新增 / 修改路由,将/ws/**请求转发到ruoyi-net:
重点:StripPrefix=0 表示不删除请求前缀,若设为 1 会把/ws/simple变成/simple,导致 ruoyi-net 找不到端点。
spring:
  cloud:
    gateway:
      routes:

        # 新增ruoyi-net路由(核心:转发/ws/**到ruoyi-net)
        - id: ruoyi-net
          uri: lb://ruoyi-net  # 负载均衡到ruoyi-net服务(必须和Nacos中服务名一致)
          predicates:
            - Path=/ws/**  # 仅转发/ws开头的请求到ruoyi-net
          filters:
            - StripPrefix=0  # 关键:不删除前缀(/ws/simple直接转发到ruoyi-net的/ws/simple)
客户端测试(最简 HTML)
- 启动
ruoyi-net服务(确认端口 9204); - 打开浏览器控制台(F12),执行代码
const ws = new WebSocket("ws://localhost:9204/ws/simple");
ws.onopen = () => console.log("直接连ruoyi-net成功");
ws.onerror = (err) => console.log("直接连ruoyi-net失败:", err);
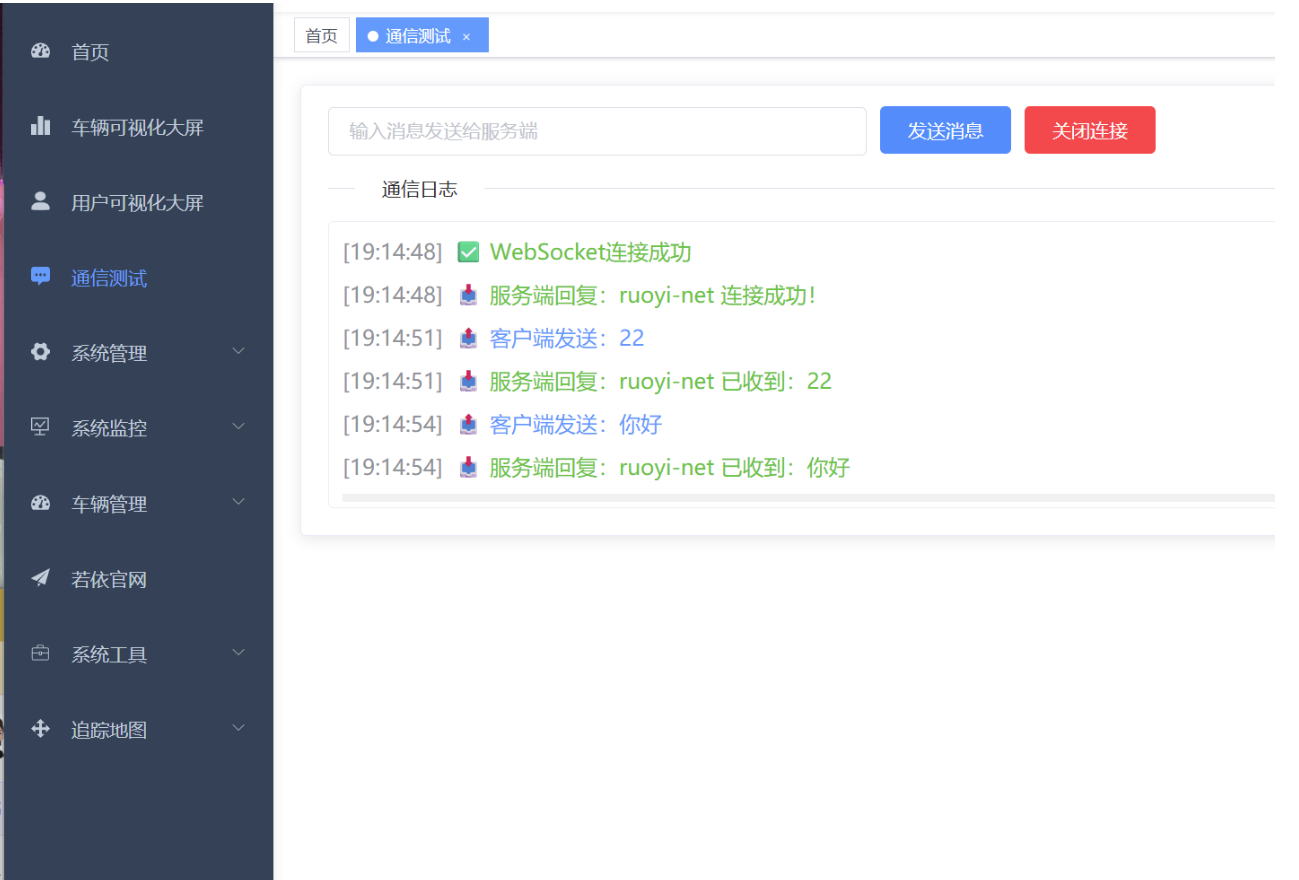
集成到 Vue 组件测试
步骤 1:新增 Vue 测试组件
在ruoyi-ui/src/views目录下新建websocket-test/index.vue:
<template>
  <div class="websocket-test-container">
    <el-card title="WebSocket通信测试" shadow="hover">
      <el-input
        v-model="msg"
        placeholder="输入消息发送给服务端"
        style="width: 400px; margin-right: 10px;"
      ></el-input>
      <el-button type="primary" @click="sendMsg">发送消息</el-button>
      <el-button type="danger" @click="closeWs" v-if="isConnected">关闭连接</el-button>

      <el-divider content-position="left">通信日志</el-divider>
      <el-scrollbar height="300px" class="msg-log">
        <div v-for="(item, index) in msgList" :key="index" class="msg-item">
          <span class="time">[{{ item.time }}]</span>
          <span :class="item.type === 'send' ? 'send' : 'recv'">{{ item.content }}</span>
        </div>
      </el-scrollbar>
    </el-card>
  </div>
</template>

<script>
export default {
  name: "WebSocketTest",
  data() {
    return {
      ws: null, // WebSocket实例
      msg: "", // 输入的消息
      msgList: [], // 消息列表
      isConnected: false, // 是否连接成功
    };
  },
  mounted() {
    // 页面挂载时初始化WebSocket
    this.initWebSocket();
  },
  beforeDestroy() {
    // 组件销毁时关闭连接
    this.closeWs();
  },
  methods: {
    // 初始化WebSocket
    initWebSocket() {
      // 注意:若前端部署后和后端跨域,需确保后端配置了跨域
      const wsUrl = "ws://localhost:9204/ws/simple";
      this.ws = new WebSocket(wsUrl);

      // 连接成功
      this.ws.onopen = () => {
        this.isConnected = true;
        this.addMsg("✅ WebSocket连接成功", "recv");
      };

      // 接收服务端消息
      this.ws.onmessage = (e) => {
        this.addMsg(`📥 服务端回复:${e.data}`, "recv");
      };

      // 连接关闭
      this.ws.onclose = () => {
        this.isConnected = false;
        this.addMsg("❌ WebSocket连接关闭", "recv");
      };

      // 连接异常
      this.ws.onerror = (err) => {
        this.isConnected = false;
        this.addMsg(`⚠️ WebSocket异常:${err}`, "recv");
      };
    },

    // 发送消息
    sendMsg() {
      if (!this.isConnected) {
        this.$message.error("WebSocket未连接,请刷新页面重试!");
        return;
      }
      if (!this.msg.trim()) {
        this.$message.warning("请输入消息内容!");
        return;
      }
      // 发送消息
      this.ws.send(this.msg);
      this.addMsg(`📤 客户端发送:${this.msg}`, "send");
      this.msg = ""; // 清空输入框
    },

    // 关闭连接
    closeWs() {
      if (this.ws) {
        this.ws.close();
        this.isConnected = false;
      }
    },

    // 添加消息到日志
    addMsg(content, type) {
      this.msgList.push({
        time: new Date().toLocaleTimeString(),
        content,
        type, // send:发送,recv:接收
      });
    },
  },
};
</script>

<style scoped>
.websocket-test-container {
  padding: 20px;
}
.msg-log {
  margin-top: 10px;
  border: 1px solid #ebeef5;
  border-radius: 4px;
  padding: 10px;
}
.msg-item {
  margin-bottom: 8px;
  line-height: 1.5;
}
.time {
  color: #909399;
  margin-right: 8px;
}
.send {
  color: #409eff;
}
.recv {
  color: #67c23a;
}
</style>
步骤 2:配置路由
修改ruoyi-ui/src/router/index.js,添加测试路由:
{
    path: '/websocket-test',
    component: Layout,
    redirect: '/websocket-test/index',
    children: [
      {
        path: 'index',
        component: () => import('@/views/websocket-test/index'),
        name: 'WebSocketTest',
        meta: { title: '通信测试', icon: 'message', affix: false }
      }
    ]
  }
关键注意事项
端口问题:
若直接连接 System 服务,地址为ws://localhost:9204/ws/simple;
若通过网关,地址为ws://localhost:8080/ws/simple(网关转发);
集群场景:
若 System 服务部署多实例,需结合 Redis 发布订阅实现消息广播(最简版无需)
权限控制:
若需鉴权,可在OnOpen方法中校验 Token(从 Session 参数中获取)。
跨域问题
效果验证
[18:50:00] ✅ WebSocket连接成功(状态:open)
[18:50:05] 📤 客户端发送:测试ruoyi-net
[18:50:05] 📥 服务端回复:ruoyi-net 已收到:测试ruoyi-net
若前端页面显示:说明ruoyi-net的 WebSocket 已通过网关正常通信。
如果仍有问题,可看看ruoyi-net 的启动日志、网关的路由日志